Getting Started

The Petfinder API


The following link will take you to the official API documentation for the Petfinder API

https://www.petfinder.com/developers/api-docs

The document has several helpful sections that I will reference going forward, but as you can see, it is sparse when it comes to actual examples.

How does the API work and what does it offer?


Methods JSONP for Cross Platform Requests Format
Methods

The API provides nine different methods, each of which can be used to obtain different kinds of information.

Of those 9, one used to obtain a security token (auth.getToken) and one for obtaining info on a specific shelter (shelter.get) are not covered in this guide.

First Steps


The first thing we have to do is register for an account so we can obtain our API key. The reason this, and many other, APIs require an API key to be used is to control and monitor the usage of their API. Many (most) APIs limit the number of daily requests, the number of records you can request, etc. These can all be tracked under the API key that is passed with each request. Many APIs also have free & premium tiers that either increase the number of requests, or allow access to different methods that are not available free. As such, each API key is unique and should generally not be shared with others (which is why I have used a dummy API in the examples in this guide, which you will replace with your own).

Obtaining Your API Key

On the Petfinder API page, click the link that is indicated in their Getting Started step. From there, either sign in to your account, or sign up for an account.

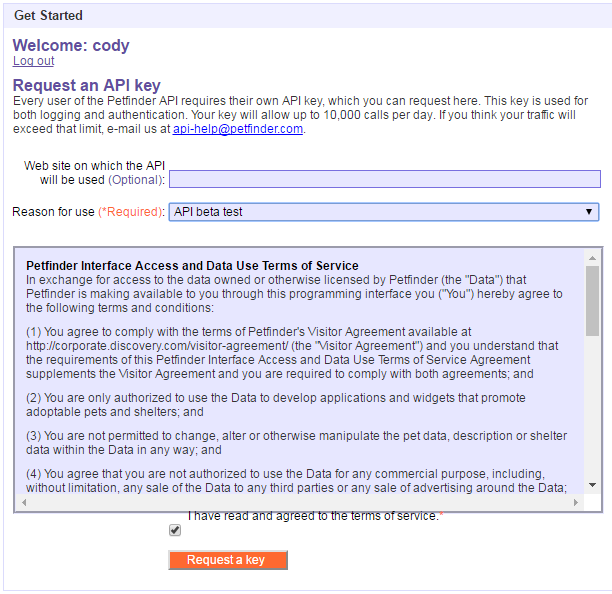
Once you are signed in you will be taken to the following page. Simply fill out the website that will use the API (this is optional) and select a reason (as of now, only API Beta Test is listed, so pick that). Then look over the terms and conditions, check the agreement box and click to request a key.

You will then be greeted with a page that provides you with your API key and your API secret. The API key is the one we are interested in, so make note of it as you will be using it in the upcoming examples.

Note: the API Secret is used for obtaining a special authentication token for the API. However it is only required for one method that the Petfinder API offers and we will not be covering that in this guide.

Example Request


				var baseURL = "https://api.petfinder.com/";
				var reqType = "breed.list?";
				var params = "animal=smallfurry&";
				var yourKey = "key=123456789&";
				var format = "format=json";
				var callback = "&callback=?";

				var fullURL = baseURL+reqType+params+yourKey+format+callback;
				$(document).ready(function(){
				  $("#request").text(fullURL);

				  $.ajax({
					dataType: "json",
					url: fullURL,
					success:(function(data){
					  var prettyData = JSON.stringify(data, null,'\t');
					  $("#results").text(prettyData);

					})
				  });

				});

			
				Request URL:

				https://api.petfinder.com/breed.list?animal=smallfurry&key=123456789&format=json&callback=?
				Results:

				{
					"@encoding": "iso-8859-1",
					"@version": "1.0",
					"petfinder": {
						"@xmlns:xsi": "http://www.w3.org/2001/XMLSchema-instance",
						"breeds": {
							"breed": [
								{
									"$t": "Abyssinian"
								},
								{
									"$t": "Chinchilla"
								},
								{
									"$t": "Degu"
								},
								{
									"$t": "Dwarf Hamster"
								},
								{
									"$t": "Ferret"
								},
								{
									"$t": "Gerbil"
								},
								{
									"$t": "Guinea Pig"
								},
								{
									"$t": "Hamster"
								},
								{
									"$t": "Hedgehog"
								},
								{
									"$t": "Mouse"
								},
								{
									"$t": "Peruvian"
								},
								{
									"$t": "Prairie Dog"
								},
								{
									"$t": "Rat"
								},
								{
									"$t": "Rex"
								},
								{
									"$t": "Short-haired"
								},
								{
									"$t": "Silkie/Sheltie"
								},
								{
									"$t": "Skunk"
								},
								{
									"$t": "Sugar Glider"
								},
								{
									"$t": "Teddy"
								}
							],
							"@animal": "smallfurry"
						},
						"header": {
							"timestamp": {
								"$t": "2017-02-27T18:05:36Z"
							},
							"status": {
								"message": {},
								"code": {
									"$t": "100"
								}
							},
							"version": {
								"$t": "0.1"
							}
						},
						"@xsi:noNamespaceSchemaLocation": "http://api.petfinder.com/schemas/0.9/petfinder.xsd"
					}
				}
			

Breaking Down the Request


That's a whole lot of information to take in at once, so let's break it down a bit, starting with the actual $.ajax()call.

		  $.ajax({
			dataType: "jsonp",
			url: fullURL,
			success:(function(data){
			  var prettyData = JSON.stringify(data, null,'\t');
			  $("#results").text(prettyData);

			})
		  });
		

The $.ajax() jQuery method we are using here performs an Ajax request.1 In short, this allows us to send a request for specific information to the API and to return that information and use it in our own web page.

In this case we provide the $.ajax() method with a dataType, a URL, and a 'success' function. Let's break this down even further.

The URL

In the actual ajax request we just provided the URL as url: fullURL. What this actually represents can be seen on the results tab:

https://api.petfinder.com/breed.list?animal=smallfurry&key=123456789&format=json&callback=?

Taken as a whole that can look like quite a mess. As you may have noticed though, I broke it down in the script used for the above request. The various parts of it can logically be broken down into smaller pieces as follows:
				var baseURL = "https://api.petfinder.com/";
				var reqType = "breed.list?";
				var params = "animal=smallfurry&";
				var yourKey = "key=123456789&";
				var format = "format=json";
				var callback = "&callback=?";

				var fullURL = baseURL+reqType+params+yourKey+format+callback;
			
Each variable above represents a different part of the full URL.
  • var baseURL is the URL of the actual API. Pretty self-explanatory.
  • var reqType is the method we will be calling.
  • var params represents the parameters we are passing to the afforementioned method.
  • var yourKey is your API key.
  • var format is the format we are telling the API to provide.
  • var callback is required for cross-domain requests.

Most of the stuff in the URL will not be changing. In fact, the only things that will change regularly will be the reqType and the params, since each method is called with a different name and requires different parameters.

The success function

As previously mentioned, this is the function that is called once the ajax request is completed successfully. As such, this is the first opportunity we have to use the data we just got. Let's take a look at the success function from the example.

				success:(function(data){
				  var prettyData = JSON.stringify(data, null,'\t');
				  $("#results").text(prettyData);

				})
			

The success function for our sample just converts the data returned from the ajax call into prettyData by calling JSON.stringify and then inserts that string as the text for the element with the id of #results.

By default, the jQuery .ajax function returns the data as an object, so for most cases, we can assign it to a variable and start using it right away.


Notes
1 - Check out this link to learn more about what an Ajax request is.

Breaking Down the Results


Here is the full text content of the JSON object returned by the API:

{
	"@encoding": "iso-8859-1",
	"@version": "1.0",
	"petfinder": {
		"@xmlns:xsi": "http://www.w3.org/2001/XMLSchema-instance",
		"breeds": {
			"breed": [
				{
					"$t": "Abyssinian"
				},
				{
					"$t": "Chinchilla"
				},
				{
					"$t": "Degu"
				},
				{
					"$t": "Dwarf Hamster"
				},
				{
					"$t": "Ferret"
				},
				{
					"$t": "Gerbil"
				},
				{
					"$t": "Guinea Pig"
				},
				{
					"$t": "Hamster"
				},
				{
					"$t": "Hedgehog"
				},
				{
					"$t": "Mouse"
				},
				{
					"$t": "Peruvian"
				},
				{
					"$t": "Prairie Dog"
				},
				{
					"$t": "Rat"
				},
				{
					"$t": "Rex"
				},
				{
					"$t": "Short-haired"
				},
				{
					"$t": "Silkie/Sheltie"
				},
				{
					"$t": "Skunk"
				},
				{
					"$t": "Sugar Glider"
				},
				{
					"$t": "Teddy"
				}
			],
			"@animal": "smallfurry"
		},
		"header": {
			"timestamp": {
				"$t": "2017-02-27T18:05:36Z"
			},
			"status": {
				"message": {},
				"code": {
					"$t": "100"
				}
			},
			"version": {
				"$t": "0.1"
			}
		},
		"@xsi:noNamespaceSchemaLocation": "http://api.petfinder.com/schemas/0.9/petfinder.xsd"
	}
}
	

Up top there is a bunch of information about the API's encoding and version number. The information we are really after starts with the "petfinder": key.

Once again there is a bunch of miscellaneous information, but the real meat is found under the "breeds":key and it's underlying "breed": and "@animal" keys.

"breed"

This holds a list of all the breeds for the animal type provided as a parameter.

"@animal"

This holds the animal type that we provided as a parameter

Your Turn


Below is a JSFiddle for you to attempt your own API request. I have gone ahead and provided the skeleton for it, but it is up to you to fill in the rest. Your goal is to perform an API call to request a listing of all breeds of cats. Be sure to join together the various URL parts with the appropriate characters ?, &, etc.

Just click the "Edit in JSFiddle button in the top right to start.

Good Luck!